how to screenshot on asus laptop
On your ASUS laptop, you can utilize any of the following techniques to take a screenshot:
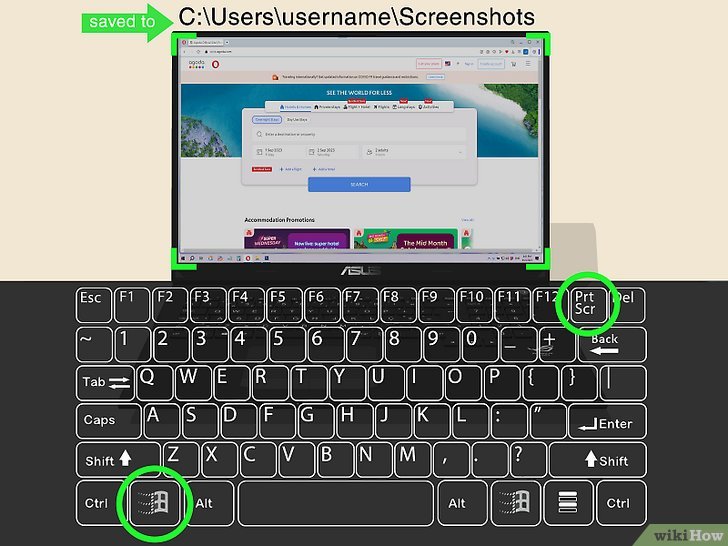
- Using the Windows and Print Screen Keys: To capture the full screen, simultaneously press the ↞ Win and ⌙ PrtScr keys. There will be a screenshot stored in the Pictures folder.
- Print Screen Key: To capture a full-screen snapshot, press ⌙ PrtScr. After the snapshot is copied to your clipboard, you can use Paint3 or another image editor to alter it.
- Using the Snipping Tool: Before taking a screenshot of your window, screen, or selection2, launch the Snipping Tool application and select a screenshot mode.
- Using Snip & Sketch (Windows 10): To open Snip & Sketch, press ↞ Win + Shift + S. Prior to taking a snapshot of your window, screen, or selection2, select a screenshot mode.
- Using Game Bar on Xbox: ⌞ Win + G will launch the Xbox Game Bar. To capture a screenshot, click the camera symbol.

how to update bios asus
Using any of the following techniques, you may update the BIOS on your ASUS laptop:
Using MyASUS: Click [Open] after typing and searching for [MyASUS] in the Windows search box. Select [Software Update] in MyASUS, then click [BIOS & FIRMWARE]. Look under the BIOS Update (Windows) category for [BIOS Installer for Windows]. To finish the update1, adhere to the guidelines1.
Access ASUS BIOS, choose the Advanced menu, then select ASUS EZ Flash [2 or 3]. Select the relevant file from Text Mode after inserting the storage device. After confirming the BIOS update, give it five to ten minutes
Load the manually chosen BIOS file using EZ Update. Information about the chosen BIOS version will be shown. To update the BIOS, click Update. To update the BIOS3, verify the revised BIOS version and restart the machine.
Using USB BIOS FlashBack: This technique works with certain models only. See FAQ 4 to find out if your motherboard is capable of supporting the USB BIOS FlashBack capability.
Please be aware that there’s a chance the BIOS won’t start up after upgrading. Please update the BIOS only after making a backup of your data. If you experience any problems upgrading the BIOS, please get in touch with the ASUS Support Center.
where is the power button on Asus laptop
Depending on the model, the power button placement on an ASUS laptop changes. Nonetheless, the power button on a lot of ASUS laptops is situated in the upper-right area of the keyboard. Frequently, a little image or symbol that resembles a circle with vertical lines within is used to indicate it.
how to factory reset asus laptop
There are several ways you may factory reset your ASUS laptop. Here are some of them:
Using MyASUS: Click [Open] after typing and searching for [MyASUS] in the Windows search box. Select [Software Update] in MyASUS, then click [BIOS & FIRMWARE]. Look under the BIOS Update (Windows) category for [BIOS Installer for Windows]. In order to finish the update, adhere to the directions.
Access ASUS BIOS, choose the Advanced menu, then select ASUS EZ Flash [2 or 3]. Select the relevant file from Text Mode after inserting the storage device. After verifying the BIOS update, give it five to ten minutes.
Load the manually chosen BIOS file using EZ Update. Information about the chosen BIOS version will be shown. To update the BIOS, click Update. To update the BIOS, verify that the version of BIOS is updated and restart the computer.
Using USB BIOS FlashBack: This technique works with certain models only. You can check the FAQ to see if your motherboard supports the USB BIOS FlashBack capability.
Please be aware that there’s a chance the BIOS won’t start up after upgrading. Please update the BIOS only after making a backup of your data. If you experience any problems upgrading the BIOS, please get in touch with the ASUS Support Center.
You can utilize any of the following techniques to return your ASUS laptop to its original configuration:
Making Use of Windows Settings After clicking Start, choose Settings. Navigate to [Recovery], then [System]. Click [Reset PC]. To return your ASUS laptop to factory settings, select whether to keep or delete personal files and then follow the on-screen instructions.
Using MyASUS: Click [Open] after typing and searching for [MyASUS] in the Windows search box. Select [Settings] and then [System] in MyASUS. Choose [Reset this PC] and then Personal Files to delete or retain. To return your ASUS laptop to factory settings, follow the instructions.

how to reset asus laptop
You can utilize any of the following techniques to return your ASUS laptop to its original configuration:
Making Use of Windows Settings After clicking Start, choose Settings. Navigate to [Recovery], then [System]. Click [Reset PC]. To return your ASUS laptop to factory settings, select whether to keep or delete personal files and then follow the on-screen instructions.
Using MyASUS: Click [Open] after typing and searching for [MyASUS] in the Windows search box. Select [Settings] and then [System] in MyASUS. Choose [Reset this PC] and then Personal Files to delete or retain. To return your ASUS laptop to factory settings, follow the instructions.
As an alternative, you can use any of the following techniques to return your ASUS laptop to its original configuration:
Making Use of Windows Settings After clicking Start, choose Settings. Navigate to [Recovery], then [System]. Click [Reset PC]. To return your ASUS laptop to factory settings, select whether to keep or delete personal files and then follow the on-screen instructions.
Using MyASUS: Click [Open] after typing and searching for [MyASUS] in the Windows search box. Select [Software Update] in MyASUS, then click [BIOS & FIRMWARE]. Look under the BIOS Update (Windows) category for [BIOS Installer for Windows]. Complete the update by following the instructions.